Section 2 - Getting Started
2.0 - The Mounting Guide / Getting Started
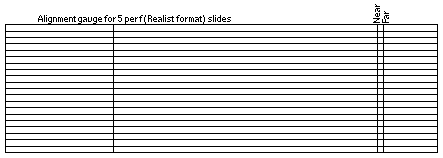
Mounting guides generally appear as in the following figure. They have numerous horizontal lines for checking the vertical alignment of the left and right film chips, and a couple of vertical lines for adjusting the stereo window (the horizontal placement of the film chips). Sample Alignment Gauge
To get started, first we must set up the light table and alignment gauge. To do this, perform the following:
- Turn on the light table.
- You will need a "guide edge" on the light table to place the mount against. Usually the frame holding the glass top of the table will be suitable.
- Place an empty, unfolded mount on the table with the smaller, more accurate openings against your guide edge, and the larger, less accurate openings furthest away from you.
- Now, slip the mounting gauge (shown above) under the mount, aligned as shown in the drawing above. Carefully adjust the gauge so that its horizontal lines are exactly parallel to the edges of the two openings closest to you. When it is lined up, tape it to the glass using a couple of pieces of masking tape.
2.2 - Film Preparation and Handling
Before discussing cutting up the film, let's diverge a little bit and cover proper film handling procedures, and preparation of the film for cutting/mounting.
Film Handling Procedures
Film can be easily damaged by fingerprints, which are very hard to remove. When you handle film, you should take precautions so you do not touch the image area of the film. Some suggestions are:
- Handle the film only by the edges
- Use cotton gloves
- Use tweezers to pick up cut film chips
Film Preparation
Before you can properly cut and mount film, it must be perfectly flat. Generally, when you get your uncut film back from the photo lab, it will be wound up in some container. The first thing you need to do is get the film flattened out. This may be done by hanging the film strip vertically with a weight on the bottom for a day or two. Alternatively, you can "reverse roll" the film. This means to unroll it, and roll it opposite the way it was rolled when you got it back from the lab for about 3-4 hours. When the film will lay flat when unrolled, it is ready to be cut and mounted.