Section 1 - Introduction
1.1 - How To Use This Guide
This guide will give you sufficient information to perform your own stereo slide mounting. Because there are a wide variety of mount styles, we will attempt to cover a representative sample. You may, if you wish, read the whole document, or, if you are only interested in mounting in a certain style, you may skip the sections covering mounts you are not interested in. Be aware, however, that in the step-by-step instructions for using the alignment gauge and setting the stereo window, we have attempted to be generic in the illustrations.
1.2 - Why Would I Want To Mount My Own Slides?
Although many people have their slides commercially mounted, there are many reasons for doing it yourself. Among them are:- Although commercial mounting was traditionally inexpensive and convenient, prices have gone up dramatically, and turn around time tends to be fairly long. Furthermore, it is often not very accurate, especially for projection, and is generally only available for standard 5-P formats.
- If you are using a non-standard format (for example, twin-35mm shots) you may wish to do your own mounting (for example, to use a stereo projector rather than twin projectors, or to correct rotational errors, etc.)
- If you are intending to enter competitions, you will want or need to do your own mounting for accuracy.
- Doing your own mounting allows you some flexibility - you may decide to mount your best slides in aluminum with glass, others in cardboard, and perhaps not mount some at all.
- The wide range of aperture sizes available in the Spicer™ precision cardboard mounts allow some images to be improved by judicious cropping.
1.3 - Why All the Different Mount Styles?
The different mount styles each offer something different in terms of ease of use, flexibility, and accuracy. Some of the pros and cons of each style are:
| Style | Advantages | Disadvantages |
|---|---|---|
| Heat-seal cardboard | Low cost, good rigidity | Not as good as glass for projection, due to slides "popping" as they warm up. Edges of image can be "fuzzy" due to cardboard fibers. Some heat seal styles have opacity/light leak problems. |
| Self-stick cardboard | More convenient; no heat or tape required. | |
| Precision tape-shut cardboard | Highest quality cardboard mounts on the market. Most aperture sizes to choose from. | Require an alignment aid such as a jig or use of the "RBT-to-cardboard" transfer technique to accurately align the two film chips. |
| Aluminum mask with cardboard foldover | Moderate cost, cleaner edges than cardboard, easier alignment. | Higher cost than cardboard. May require washing to remove oils before use. |
| Aluminum mask with glass | Best for critical projection (i.e. for competition), and for avoiding finger prints and emulsion damage during handling.. | More expensive, most difficult to maintain due to cleaning of four additional surfaces. Risk of glass breakage when mailing. Possible formation of Newton's Rings. |
| Plastic (RBT) | Pin bar system makes them easiest for avoiding rotational errors, and for adjusting the stereo window without affecting vertical alignment. | Highest cost. Less opaque than some cardboard mounts. Black forward/white forward decision may depend on intended use (projection or hand viewing). "Bulky" stereo window frame. |
Obviously which mount style you choose is a matter of personal preference and your intended use. Many people use several styles - for example, you may wish to use cardboard mounts for most of the pictures on a roll of slides, and use RBT plastic or aluminum masks and glass mounts for your best work. Most competitions highly recommend or even require glass-mounted slides.
1.4 - Things You'll Need
You will need the following tools and supplies:- A light table, or at least some means of viewing slides through a flat lighted surface.
- A film cutter or sharp scissors.
- Tweezers for handling and adjusting the film chips.
- Masking tape.
- Tape for slide mounting, preferably a quality Mylar® tape.
- Slide mounts.
The following would be helpful:
- A loupe, magnifier, or high power reading glasses (available from a drug store).
- Cotton gloves (available from larger photo stores).
- Staticmaster brush for cleaning slides and glass (available from larger photo stores).
For heat-seal mounts, you will also need:
- A small iron (i.e. a "travel" iron) -- or --
- A "tacking" iron. This is sold by Kodak for tacking a print down with mounting paper. This is easy to use, since it is small enough to fit between the two film chips on the mount surface.
1.5 - The Stereo Window
The fact that stereo photos do not cover the entire field of human vision introduces the concept of the "stereo window". When you view a projected slide, it appears that you are looking through a "window" at a scene. While it is possible and in some cases desirable to have an object protrude through the window, this must be done with care. When mounting slides, you control how close objects appear, and thus where they sit in relation to the stereo window, by horizontal adjustment of the film chips.
Note: In home projection, the stereo window is usually located at the projection screen. We will assume that is the case for purposes of this discussion.An example: Suppose we have a picture of Seymour Depthe from the waist up. He is pointing his finger directly at the camera. If the slide is mounted so that his arm extends through this "window", it can be dramatic. When projected, it will appear that his arm and pointing finger extend out of the screen, out into the audience. However, if the person mounting the slides of Seymour has placed him too close, someone watching the slide show will encounter some distress, because the brain will get conflicting visual clues. On the one hand, Seymour's waist will appear to be in front of the screen, but on the other hand, the brain knows that he must be at or behind the screen, because that is were the stereo window appears, and obviously a human cannot be floating in midair with no legs!
In general, most slides should be mounted with the nearest object at or behind the stereo window. You may choose to have some object(s) protrude through the window, but then you must ensure that all objects located at the edges of the slide mount openings DO NOT protrude through the window, in order to avoid Seymour's waist problem.
The stereo window is best taught visually. Refer to Shab Levy's online stereo window demonstration (PDF), or our "Stereo Window Tutorial," which includes five Realist-format slides that demonstrate the stereo window.
1.6 - Anatomy of a Stereo Slide Mount
In this section, we'll describe several popular stereo mounts. Many of the mounts have an accurate (to better than 0.1 mm) set of openings, and a less accurate (larger) set. This is to avoid problems with mechanical tolerances when the mounts are produced. If the openings are offset slightly when the mount is folded together, then that offset (up to a point) will have no effect on the actual slide area visible. This is done in almost all types of slides, but is particularly important in stereo slide mounts, since very small changes in the amount of slide area shown can affect the stereo window setting. We will use the "more accurate" (smaller) openings for all our mounting.Traditional Heat Seal Mount
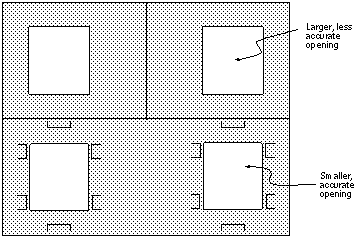 Realist heat-seal mount, viewed from the inside (the side with the darker
heat-seal material)
Realist heat-seal mount, viewed from the inside (the side with the darker
heat-seal material)Note the six "pushed up" tabs around the edge of each opening, to serve as alignment guides. These are small rectangles of the cardboard "pushed up" to create a guide for placement of the film chip.
Precision Tape Shut Mount
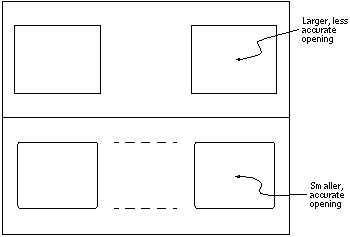 A Precision tape-shut mount - European format
This mount has no alignment ridges, which allows more vertical freedom at the expense of making it slightly more difficult to perform the vertical alignment. There are two "grooves" on the outside of the more accurate half (indicated here by dotted lines, since this view shows the inside of the mount) which are used to help identify the accurate side (also the front when viewing) of the mount.
Aluminum Mask
This mount (shown here using an EMDE mask as a model) is called a mask because it is generally used in connection with some additional mounting system (an aluminum frame, a cardboard foldover, or a glass carrier, for example). The EMDE masks do not seem to have a "rough" and "accurate" opening system.
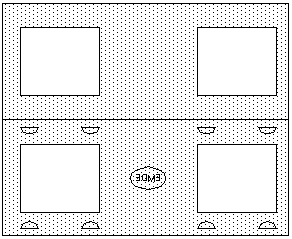 An Aluminum mask (EMDE, European format)
In this case the small "tabs" shown are a raised "channel" of aluminum. Looking down from the end of the mount, they look like this:
These channels form a guide for aligning the chips, (similar to the raised tabs on a heat-seal mount) with the added advantage that they grip the film chip, making it much easier to do the alignment of the slides.
Albion aluminum masks are similar, but have one long channel above and below each opening, rather than the two tabs shown in the EMDE mask above, and do not have a "foldover" side:
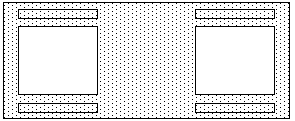 An Aluminum mask (Albion, European format)
Slip-In Mounts
(Under construction)